
Step-by-Step Guide: Activating DNS over HTTPS on Your Windows 11 PC

Step-by-Step Guide: Activating DNS over HTTPS on Your Windows 11 PC
Quick Links
- Encrypted DNS Is More Private and Secure
- First, Choose a Supported Free DNS Service
- Next, Enable DNS over HTTPS in Windows 11
Key Takeaways
- Windows 11 allows you to encrypt your DNS requests through DNS over HTTPS (DoH), providing enhanced online privacy and security.
- To enable DoH on Windows 11, go to Settings > Network & Internet > Wi-Fi Properties > Hardware Properties and click the “Edit” button next to DNS Server.
- Enter a DNS server of your choice for IPv4 and IPv6, then make sure that “DNS Over HTTPs” is set to “On.”
For improved online privacy and security, Windows 11 lets you use DNS over HTTPS (DoH) to encrypt the DNS requests your computer makes while you browse or do anything else online. Here’s how to set it up.
Encrypted DNS Is More Private and Secure
Every time you visit a website using a domain name (such as “google.com,” for example), your computer sends a request to a Domain Name System (DNS) server . The DNS server takes the domain name and looks up the matching IP address from a list. It sends the IP address back to your computer, which your computer then uses to connect to the site.
This domain name fetching process traditionally happened unencrypted on the network. Any point in between could intercept the domain names of the sites you are visiting. With DNS over HTTPS , also known as DoH, the communications between your computer and a DoH-enabled DNS server are encrypted. No one can intercept your DNS requests to snoop on the addresses you’re visiting or tamper with the responses from the DNS server.
First, Choose a Supported Free DNS Service
As of Windows 11’s release, DNS over HTTPS in Windows 11 only works with a certain hard-coded list of free DNS services (you can see the list yourself by running netsh dns show encryption in a Terminal window ).
Here’s the current list of supported IPv4 DNS service addresses as of November 2023:
- Google DNS Primary: 8.8.8.8
- Google DNS Secondary: 8.8.4.4
- Cloudflare DNS Primary: 1.1.1.1
- Cloudflare DNS Secondary: 1.0.0.1
- Quad9 DNS Primary: 9.9.9.9
- Quad9 DNS Secondary: 149.112.112.112
For IPv6 , here is the list of supported DNS service addresses:
- Google DNS Primary: 2001:4860:4860::8888
- Google DNS Secondary: 2001:4860:4860::8844
- Cloudflare DNS Primary: 2606:4700:4700::1111
- Cloudflare DNS Secondary: 2606:4700:4700::1001
- Quad9 DNS Primary: 2620:fe::fe
- Quad9 DNS Secondary: 2620:fe::fe:9
When it comes time to enable DoH in the section below, you’ll need to choose two pairs of these DNS servers—primary and secondary for IPv4 and IPv6—to use with your Windows 11 PC. As a bonus, using these will very likely speed up your internet browsing experience.
Next, Enable DNS over HTTPS in Windows 11
To get started setting up DNS over HTTPS, open the Settings app by pressing Windows+i on your keyboard. Or you can right-click the Start button and select “Settings” in the special menu that appears.

In Settings, click “Network & Internet” in the sidebar. In Network & Internet settings, click the name of your primary internet connection in the list, such as “Wi-Fi” or “Ethernet.” (Don’t click “Properties” near the top of the window—that won’t let you encrypt your DNS connections.)

On the network connection’s properties page, select “Hardware Properties.”
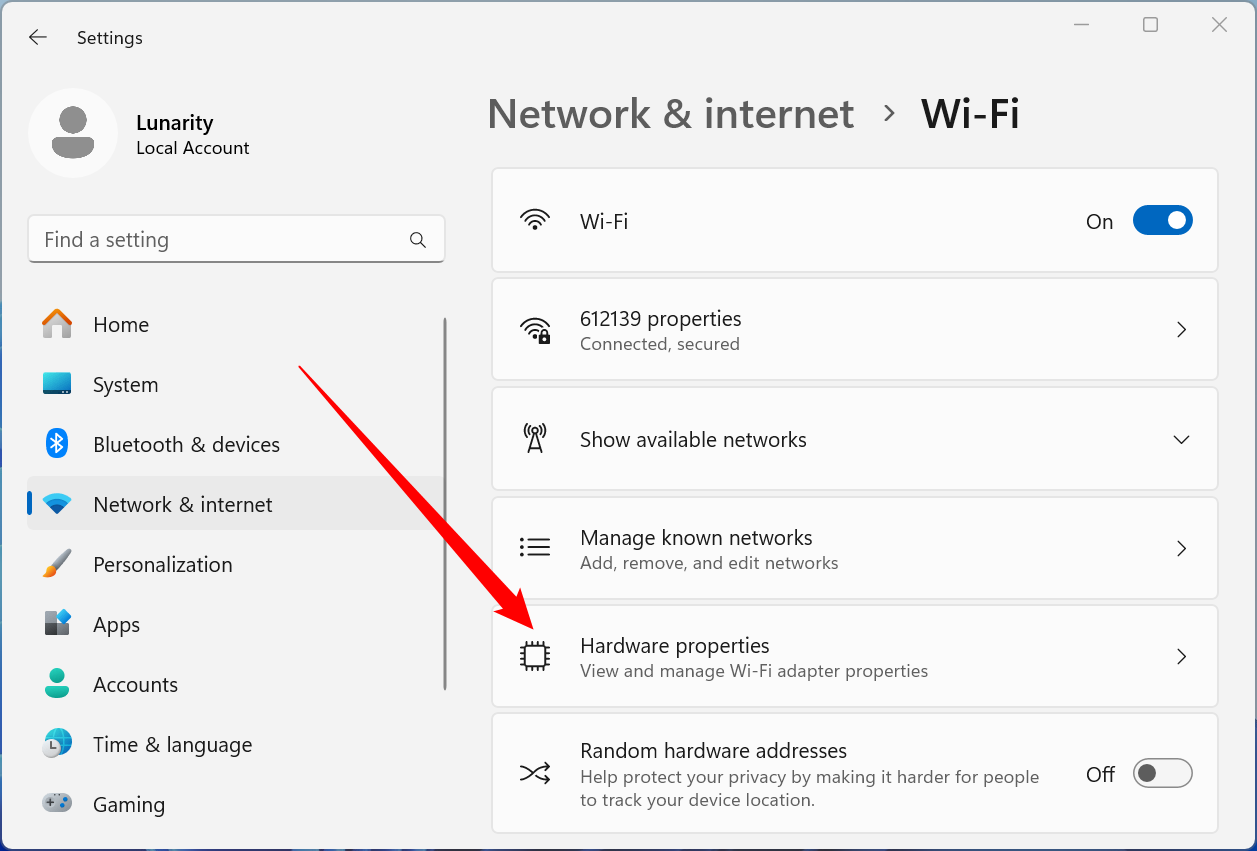
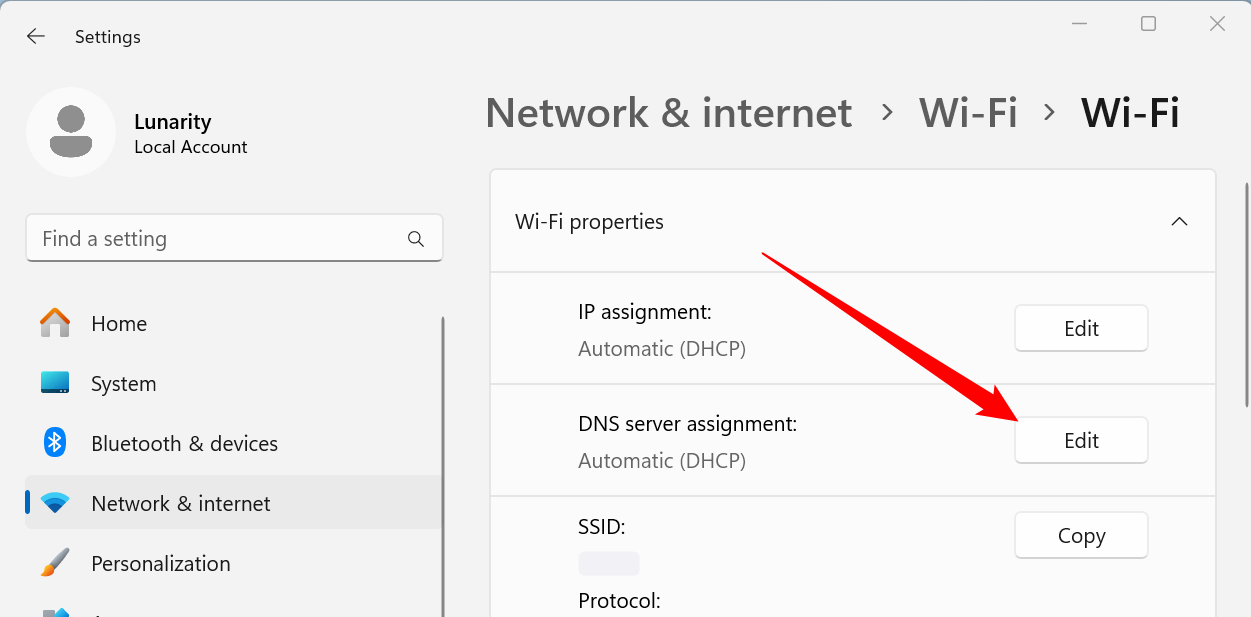
On the Wi-Fi or Ethernet hardware properties page, locate the “DNS Server Assignment” option and click the “Edit” button beside it.
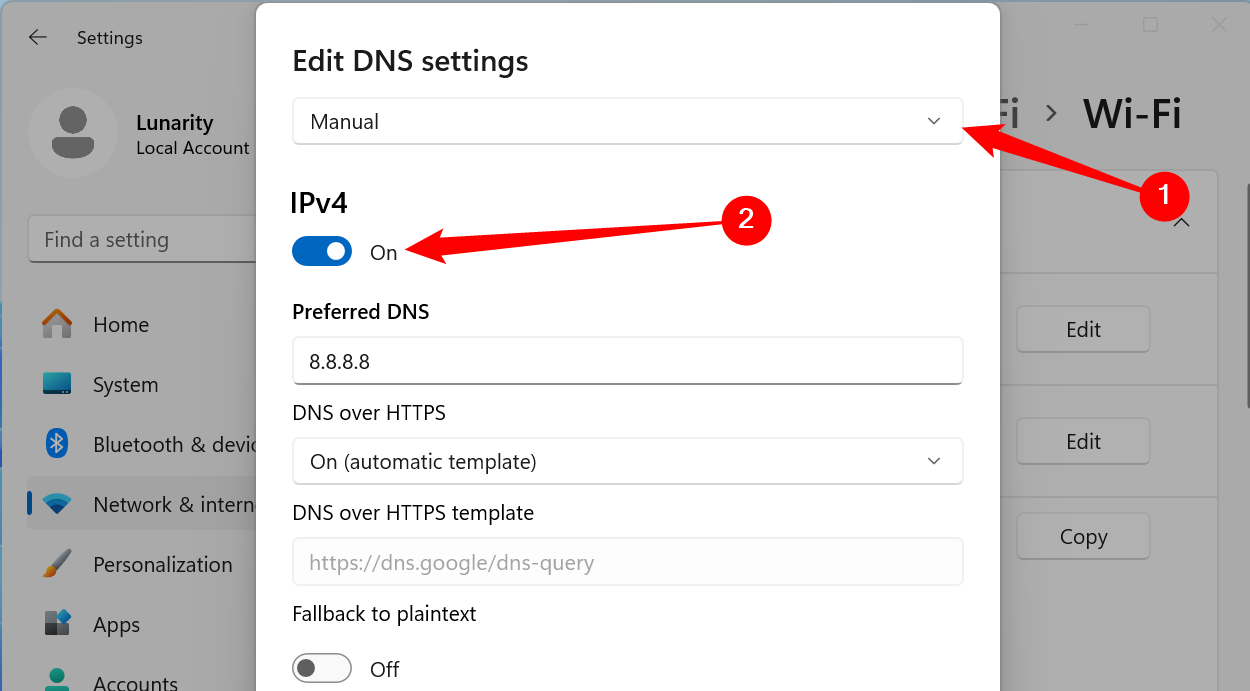
In the window that pops up, use the drop-down menu to select “Manual” DNS settings. Then flip the “IPv4” switch to the “On” position.
In the IPv4 section, enter the primary DNS server address you chose from the section above in the “Preferred DNS” box (such as “8.8.8.8”). Similarly, enter the secondary DNS server address in the “Alternate DNS” box (such as “8.8.4.4”).
If you don’t see the DNS encryption options, then you’re editing the DNS settings for your Wi-Fi SSID. Make sure you select the connection type in Settings > Network & Internet, then click “Hardware Properties” first.
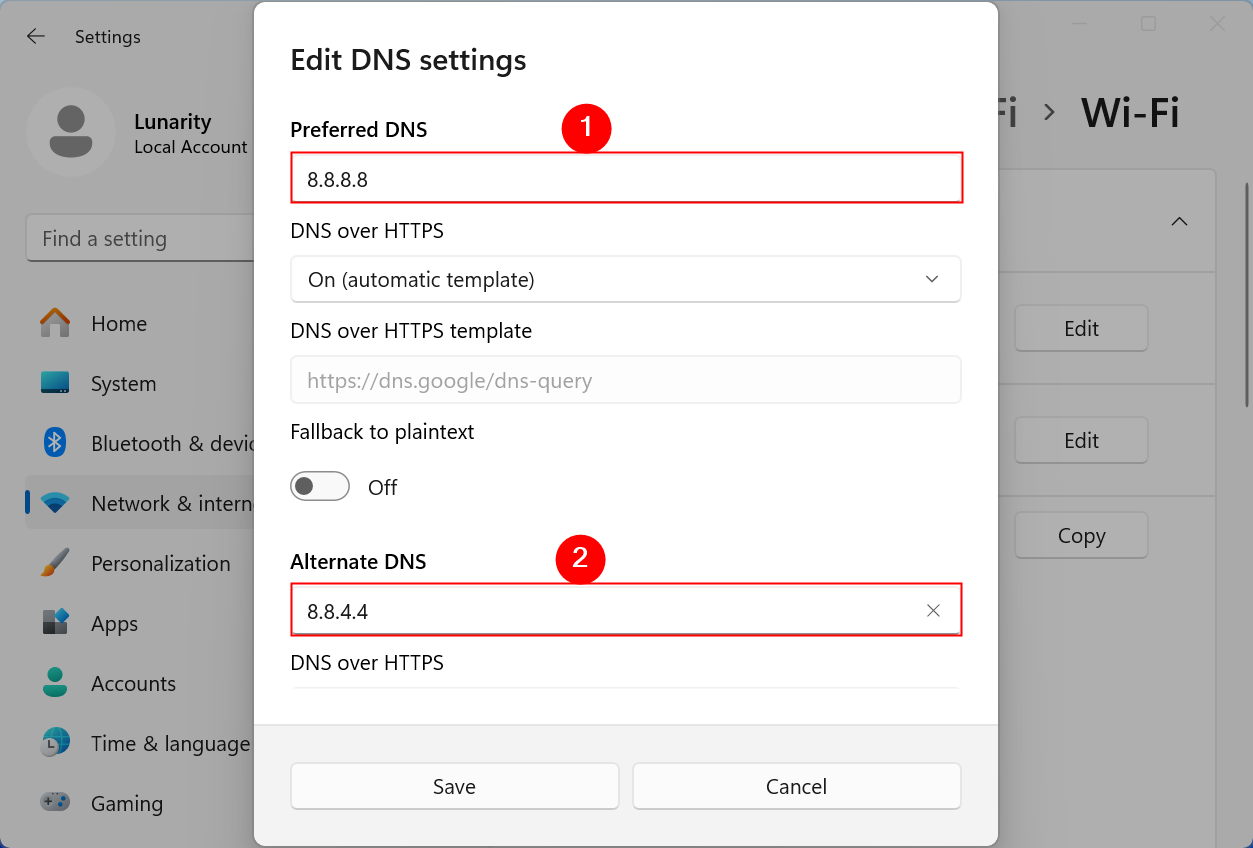
In the same window, set “DNS Over HTTPs” to the “On” position.

After that, repeat this process with IPv6.
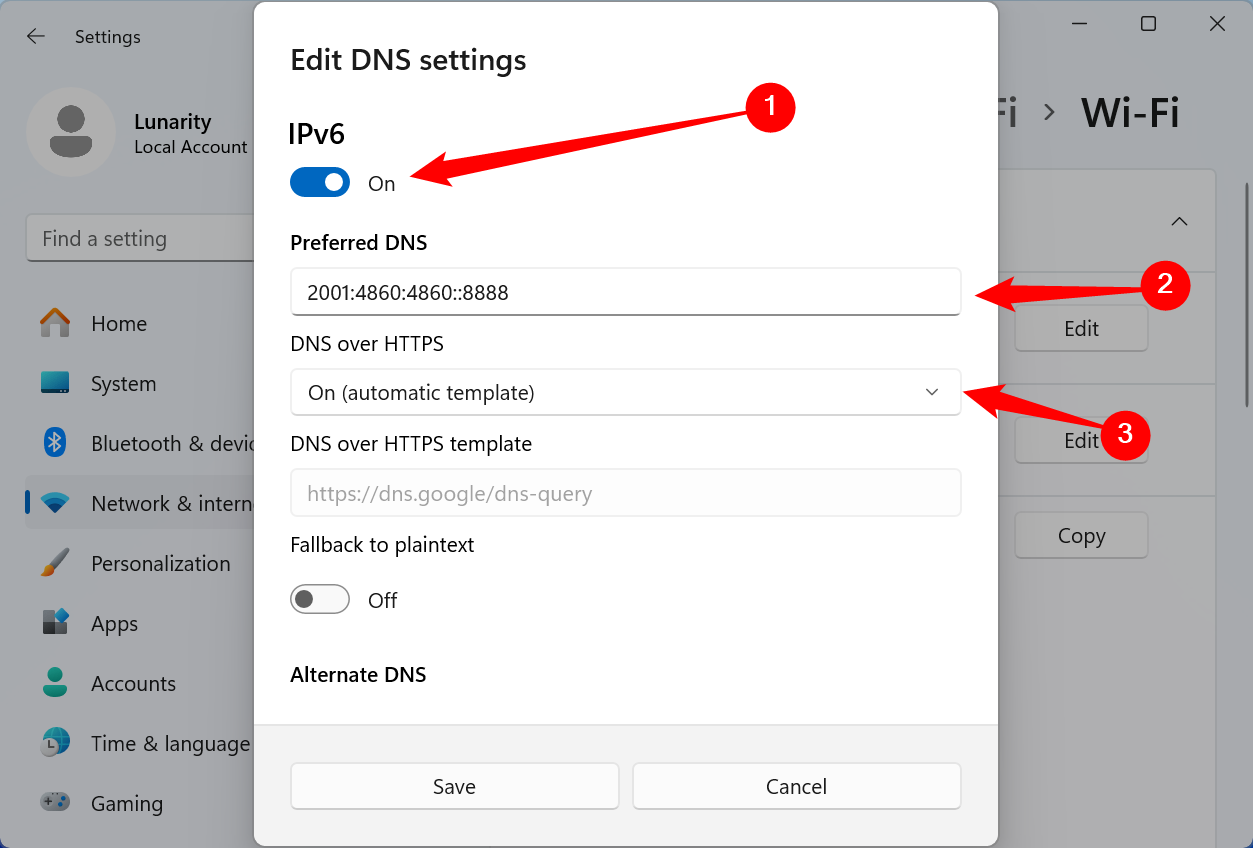
Flip the IPv6 switch to the “On” position, and then copy a primary IPv6 address in the section above and paste it into the “Preferred DNS” box. Next, copy a matching secondary IPv6 address and paste it into the “Alternate DNS” box. Make sure you have enabled DNS Over HTTPs, then click “Save.”
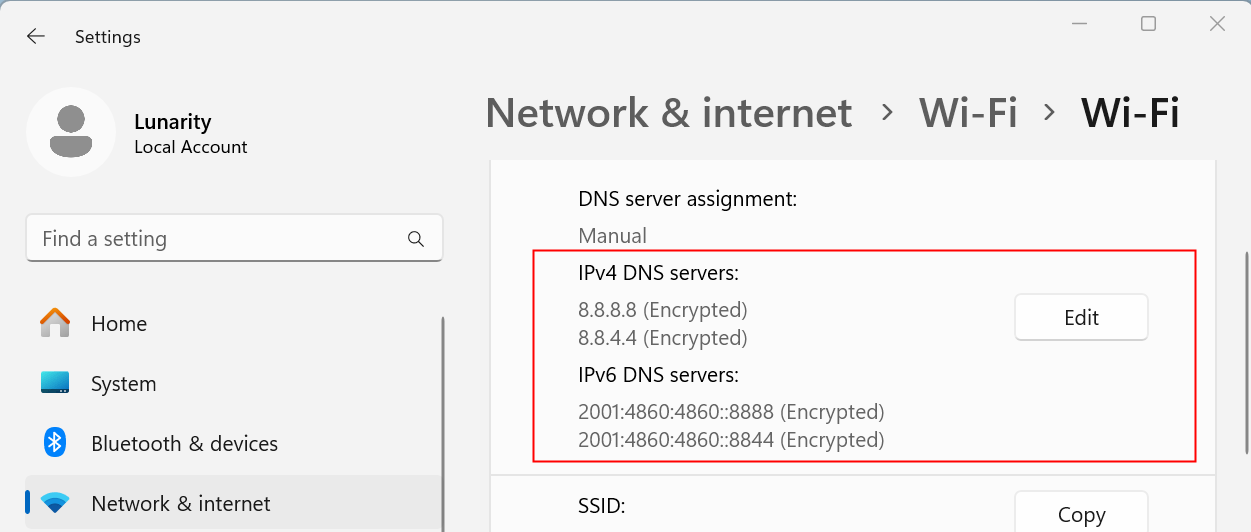
Back on the Wi-Fi or Ethernet hardware properties page, you’ll see your DNS servers listed with an “(Encrypted)” beside each one of them.
That’s all you need to do. Close the Settings app, and you’re ready to go. From now on, all of your DNS requests will be private and secure. Happy browsing!
If you experience network problems after changing these settings, be sure to check that you entered the IP addresses correctly. A mistyped IP address would result in the DNS servers being unreachable. If the addresses appear to be typed correctly, try disabling the “IPv6” switch in the DNS servers list. If you configure IPv6 DNS servers on a computer without IPv6 connectivity, this could cause connectivity issues.
Also read:
- [Updated] 2024 Approved The Best Budget Camera Stabilizers for YouTube Stars
- [Updated] In 2024, Mastering YouTube Clips Beginnings & Conclusions on a Budget
- [Updated] Streamlining the Experience Accessing Facebook's Video Features Through Apple TV for 2024
- [Updated] StreamSurf Skimming Above DaCast
- [Updated] Unveiling the Art of Night Sky Captures on iPhone
- 2024 Approved Tutorial Transforming Photos Into Works of Art
- 2024 Approved Unlimited Choice in Free, Personalized Outro Sounds
- 2024 Approved Unparalleled VR Game Setups Top 8 Edition
- 2024 Approved Unveiling The 10 Leading Christian Church Streamers
- Decoding History: The Impactful Legacy Left by the Second Opium War - Expert Analysis From YL Computing Software Solutions
- Get Your Zexmo Bluetooth Adapter Installed on Windows 10/7/8 Today!
- How To Remove or Bypass Knox Enrollment Service On Huawei Nova Y71
- In 2024, How To Fake GPS On Vivo Y100A For Mobile Legends? | Dr.fone
- In 2024, Speedy Explorer - Windows 10 Photography Interface
- In 2024, Unlocking Potential with MAGIX Paint Pro
- Streamlining Your Creative Process with VSCO App for 2024
- The Quick Glitch Fix for Podcast Broadcasts for 2024
- Ultimate Tutorial on Halting Your Paramount Streaming Account
- Unlock Spark AR's Full Potential with Personalized LUT Implementations for 2024
- Title: Step-by-Step Guide: Activating DNS over HTTPS on Your Windows 11 PC
- Author: Christopher
- Created at : 2025-01-07 17:52:08
- Updated at : 2025-01-09 22:23:49
- Link: https://some-approaches.techidaily.com/step-by-step-guide-activating-dns-over-https-on-your-windows-11-pc/
- License: This work is licensed under CC BY-NC-SA 4.0.