
Mastering the DIR Function: A Comprehensive Guide for Windows Users

Mastering the DIR Function: A Comprehensive Guide for Windows Users
Quick Links
- What is DIR?
- DIR Command Switches
- Display Files Based on File Attributes with DIR
- Display Stripped Results
- Display Using Thousands Separator
- Display Results in Columns
- Display DIR Results in Lowercase
- Display Filename Results on the Far Right
- Display Results in Sorted Order
- Display Results One Page at a Time
- Display File Metadata with DIR
- Display Alternate Data Streams (ADS)
- Display All Files and Folders and Everything Inside
- Display Results from DIR Sorted by Time
- Display DIR’s Results in Wide Format
- Display Short Name Filenames
- Display Help Pages For DIR
- DIR Command Examples
Key Takeaways
- The dir command can be used in Command Prompt or PowerShell. It lists files and subdirectories in a specific directory.
- dir can take dozens of different switches to customize the output to display more concise or relevant information.
- Use switch /A followed by a letter code to display files with specific attributes, such as directories, hidden files, or read-only files.
Run “dir” in Command Prompt to list all of the files and folders in the current directory. Dir also take special arguments to sort and select what kinds of files and folders are displayed. For example, “dir /h” will display hidden files.
What is DIR?
The DIR command is a powerful Windows Command Prompt function that lists all files and subdirectories contained in a specific directory. The DIR command also offers some switches that unlock some powerful functionality.
DIR Command Switches
You can use the DIR command by itself (just type “dir” at the Command Prompt) to list the files and folders in the current directory. To extend that functionality, you need to use the various switches, or options, associated with the command. We’ve compiled a list of some of the most useful dir switches, with examples.
Display Files Based on File Attributes with DIR
You can add “/A” followed by a letter code after the DIR command to display files with a specific attribute. These letter codes include:
- D: Displays all directories in the current path
- R: Displays read-only files
- H: Displays hidden files
- A: Files that are ready for archiving
- S: System files
- I: Not content indexed files
- L: Reparse points
So, for example, to display just the directories in the current path, you’d type the following command and then hit Enter:
dir /ad
You can combine those codes, too. For example, if you wanted to show only system files that are also hidden, you could use the following command:
dir /ash
You also can add a “-“ (minus) in front of any of those letter codes to specify that the DIR command does not show that kind of file. So, for example, if you don’t want to see any directories in the results, you could use this command:
dir /a-d
One more tip: Instead of cramming the main switch and the letter code together the way we did in our examples, you can use a colon to separate the switch from its optional codes. Like this:
dir /a:d
It can make things a little easier to parse, but it’s entirely optional.
Display Stripped Results

Using the /b switch with the DIR command strips away all excess information, displaying only the name of the folders and files in the current directory and not attributes like file size and time stamps. Type the following command to make it work:
dir /b
Display Using Thousands Separator
In modern versions of Windows, the Command Prompt shows large numbers separated by commas (so: 25,000 instead of 25000). This wasn’t always the case. In older versions, you had to use the /c switch to show those commas.
Why bother including it here if it’s already the default? Because if for whatever reason you don’t want to show those commas, you can use this switch along with the “-“ minus sign:
dir /-c
Display Results in Columns

You can use the /D switch to display results in two columns instead of one. When you display results this way, the Command Prompt does not show extra file information (file size and so on)—just the names of the files and directories.
dir /D
Display DIR Results in Lowercase
The /L switch displays all names of files and folders as lowercase.
dir /L
Display Filename Results on the Far Right

By default, the Command Prompt displays the names of files to the far right. The /N switch used to be used to achieve this effect. Now, you can use it along with a “-“ (minus) to have filenames displayed on the far left instead.
dir /-N
Display Results in Sorted Order
You can use the /O switch followed by a letter code to display directory results sorted in various ways. Those letter codes include:
- D: Sorts by date/time. Older entries appear first.
- E: Sorts by file extension in alphabetical order.
- G: Sorts by listing folders first, then files.
- N: Sorts by the name of file/folder in alphabetical order.
- S: Sorts by file size, smallest to largest.
So, for example, you could use the following command to sort results by time and date, with older entries appearing first:
dir /OD
You can also add “-“ (minus) before any of the above options to reverse the order. So, for example, if you want to sort files by time and date with newer entries appearing first, you could use this command:
dir /O-D
Display Results One Page at a Time

Some directories have hundreds or thousands of files. You can use the /P switch to have the Command Prompt pause the results after it displays each screen. You have to press a key to continue viewing the next page of results.
dir /P
Display File Metadata with DIR

Using the /Q switch on the DIR command displays metadata tied to files and directories, along with ownership details.
dir /Q
Display Alternate Data Streams (ADS)
The /R switch displays any alternate data streams (ADS) that files might contain. ADS are a feature of the NTFS file system that let files contain additional metadata for locating files by author and title.
dir /R
Display All Files and Folders and Everything Inside
You can use the /S switch to recursively show all files and folders inside the current directory. This means all files and folders in every subdirectory, all files and folders in those subdirectories, and so on. Be prepared for a lot of results.
dir /S
Display Results from DIR Sorted by Time
Using the /T switch along with a letter code lets you sort results by the different time stamps associated with files and folders. These letter codes include:
- A: The time the item was last accessed.
- C: The time the item was created.
- W: The time the item was last written to. This is the default option used.
So, for example, to sort results by the time items were created, you could use the following command:
dir /TC
Display DIR’s Results in Wide Format
The /W switch is similar to /D (which shows columns), but instead, it sorts the results in wide format horizontally.
dir /W
Display Short Name Filenames
The /X switch shows a file’s short name when the long name doesn’t comply with 8.3 naming rules.
dir /X
Display Help Pages For DIR
Using the /? switch displays helpful information regarding the DIR command, including a brief description of all the switches we’ve talked about.

DIR Command Examples
All right, now you know about the switches and options associated with the DIR command. Let’s take a look at a few real-world examples to gain a better understanding as to how you can start putting them to use.
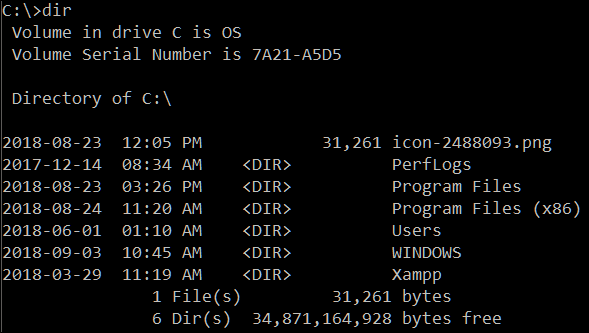
A simple dir command returns a list of all files and folders in the current directory you’re in.
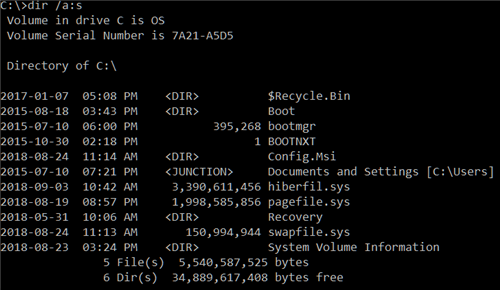
Running the following command shows all system files inside your current path by utilizing the “s” attribute:
dir /a:s
But what if you want to view all files of a certain type within all subsequent folders of your current path. That’s easy, just run this extremely fast and useful command:
dir *.mp3 /s
You can replace the “.mp3” part with whatever file format you’re looking for.
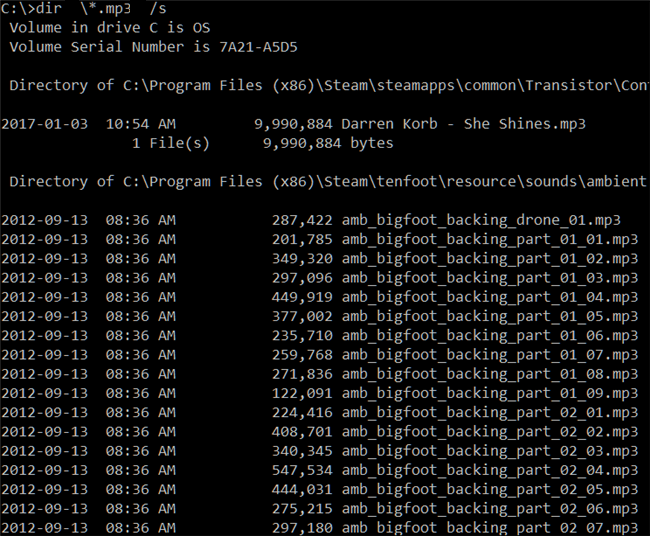
The asterisk acts as a wildcard , saying “find anything with .mp3 file format at the end” while the “/s” recursively looks through all folders within your current path.
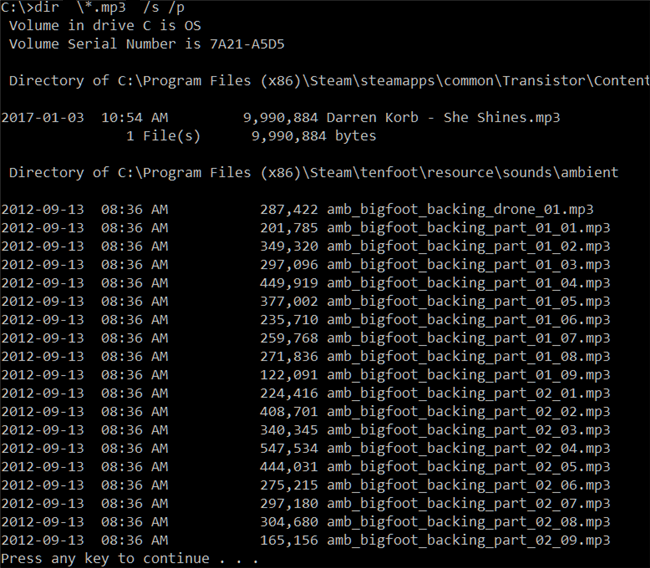
Now, you may have noticed that returned a LOT of results. Almost too many to be able to read before they scrolled off the screen. This is where we can use the pause switch to give you a chance to read them. To do that, modify the command like this:
dir *.mp3 /s /p
Another trick the Command Prompt offers is called piping. You can use the “>” character to send the results of one command to another place or service. A good example of this is sending all your results to a text file . You can then scroll through them later or import them into other types of documents. To do that, you could use the command:
dir *.mp3 /s /b > filename.txt
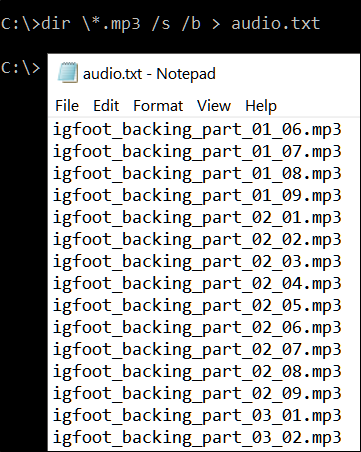
We added the /b switch in there to only output the filenames themselves, without any of the other details. The greater than symbol reroutes everything normally displayed in your results directly to the file.
There are many more combinations and uses for the DIR command, but this should be a good starting point to help you understand the basics.
Also read:
- [New] Ideal Screen Capture Device for Effective Video Sharing
- [New] In 2024, Essential YouTube Short Content Techniques Unveiled
- [Updated] A Beginner's Blueprint for Bolstering YouTube Believers
- [Updated] The Role of Extras in Creating Dynamic Storytelling
- 2024 Approved Navigating Windows Movie Maker for Efficient Video Projects in Windows 8
- 2024 Approved The Future's in Your Hands with PowerDirector '24 Unleashed
- 完成 TPM 2.0 驗證並開始 Windows 11 更新流程
- Frei Kopieren Von Einer DVD Auf Einen USB-Stick: Eine Schritt-Für-Schritt-Anleitung
- In 2024, Ultimate Shot Upgrade - No Money Needed
- List of Pokémon Go Joysticks On Samsung Galaxy A34 5G | Dr.fone
- Transform Your Gaming Experience: A Comprehensive Guide for Steam Play on Meta Quest Xbox Series S
- Understanding Auto-Play Features: Why Your iPhone Chooses Songs on Apple Music
- VisualVertexZoomerX7 Enhance & Expand with Ease
- Title: Mastering the DIR Function: A Comprehensive Guide for Windows Users
- Author: Christopher
- Created at : 2025-01-04 18:15:17
- Updated at : 2025-01-10 01:13:10
- Link: https://some-approaches.techidaily.com/mastering-the-dir-function-a-comprehensive-guide-for-windows-users/
- License: This work is licensed under CC BY-NC-SA 4.0.