
"In 2024, Unlocking Windows 10 Seamless Media Importation Techniques"
Unlocking Windows 10: Seamless Media Importation Techniques
How to Import Photos and Videos in Windows 10 (Deepest Secret)

Shanoon Cox
Mar 27, 2024• Proven solutions
In the past, importing photos and videos to a laptop or desktop computer from various devices was not the easiest task to accomplish. But Windows 10 has made the process a lot easier for people who have Windows computers. Importing photos and video in Windows 10 can be done through a few simple steps, which we will highlight below.
- Part1: Import Photos and Video from a Phone
- Part2: Start Importing in Photos App
- Part3: Troubleshooting the Phone to PC Connection
- Part4: Import Photos and Video from a Camera
Part 1: Import Photos and Video from a Phone
Step 1: Connecting Your Phone
If you are moving photos and video to Windows 10 from a smartphone, you will first have to connect your phone to the computer. It can be done through the USB cable that you should have received with the smartphone. Plug one end of the cable into your phone and the other into the USB port of your desktop or laptop.

Step 2: Enable File Exchange
Your phone will have settings regarding file transfers when it is connected to a computer. Make sure that media viewing and transferring is selected, which will allow Windows 10 File Explorer on the computer to recognize your device.
Step 3: Import Photos and Videos
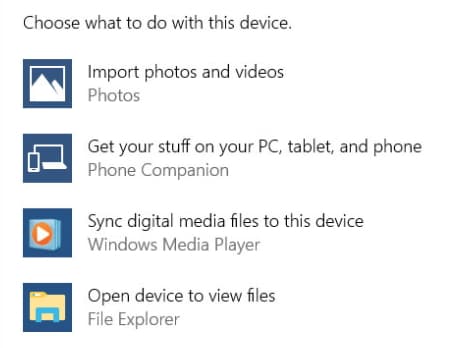
Now that your phone is recognized, you should see the camera or phone pop up along with your hard drives and other external drives. You can right click on its icon, select “Import Photos and Videos” and proceed from there.

Step 4: Import
Your computer will tell you how many pictures and photos were found. You can either review, organize and group these items, or you can choose to import all the new items in one go.
The great thing about reviewing the photos and videos before importing them onto your computer is that you can choose folders for different files, name those folders and ensure that you are only importing files that are not on your system already.
Part 2: Start Importing in Photos App
Another option for you is the Photos app that is pre-installed in computers with Windows 10.
Go to Start -> All Apps -> Photos and open it up. Your phone or camera should be connected to the computer when you are attempting this process.
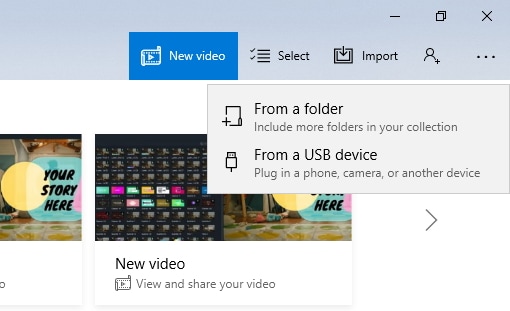
Click the Import button on the Photos app and choose the items that you want to import. When you have selected all the items you want, click on continue and then import. All your files will be added onto your computer and they will be visible within the Photos app.
Within the app, it is easy to see your photos and videos as they are organized based on the date they are imported. So you will be able to see exactly what you have added in the most recent imports and with future imports as well.
You may also like: How to Add Titles/Text to Video on Photos App in Windows 10 >>
Part 3: Troubleshooting the Phone to PC Connection
There are instances where you may have some problems connecting your phone to the computer, even if you have the USB cable connected on both ends.
The first thing to check is whether your USB port works. Try connecting some other device, such as a mouse or keyboard, into that port. If the device works, it means your port is not the cause of the problem. Now check the cable with a smartphone charger. If your phone charges with the cable, it means your cable is not a problem.
As mentioned above, you must ensure that you have enabled media and file transfers in the USB settings when you connect your phone to the computer. It is the only way that your computer has permission to access the files on your smartphone.
If you have an iPhone, ensure that your device is unlocked. You will get a “Trust this device” prompt and you must accept it. And if your photos are saved directly to iCloud and not your iPhone, you will need to complete a transfer from iCloud, which you can do by visiting the website or using the relevant desktop app.
Part 4: Import Photos and Video from a Camera
Those who are importing photos and videos from a camera rather than a smartphone can use the above options as well. Both Windows 10 File Explorer and the Photos app will be compatible with your camera, provided it can connect through a USB cable and a USB port on the computer.
Connect the camera to your phone and then follow the above steps to import your media content.

Conclusion
If you own a Windows 10 desktop or laptop, it is very easy to connect a smartphone or digital camera to your computer. Then you will be able to use File Explorer or the built in Photos app to access and download your photos and videos. Adding your content to the computer lets you save the files, share them with friends, edit them using programs like Photoshop, or save space on your smartphone/camera.
Shanoon Cox
Shanoon Cox is a writer and a lover of all things video.
Follow @Shanoon Cox
Shanoon Cox
Mar 27, 2024• Proven solutions
In the past, importing photos and videos to a laptop or desktop computer from various devices was not the easiest task to accomplish. But Windows 10 has made the process a lot easier for people who have Windows computers. Importing photos and video in Windows 10 can be done through a few simple steps, which we will highlight below.
- Part1: Import Photos and Video from a Phone
- Part2: Start Importing in Photos App
- Part3: Troubleshooting the Phone to PC Connection
- Part4: Import Photos and Video from a Camera
Part 1: Import Photos and Video from a Phone
 LYRX is an easy-to-use karaoke software with the professional features karaoke hosts need to perform with precision. LYRX is karaoke show hosting software that supports all standard karaoke file types as well as HD video formats, and it’s truly fun to use.
Step 1: Connecting Your Phone
If you are moving photos and video to Windows 10 from a smartphone, you will first have to connect your phone to the computer. It can be done through the USB cable that you should have received with the smartphone. Plug one end of the cable into your phone and the other into the USB port of your desktop or laptop.
 DLNow Video Downloader

Step 2: Enable File Exchange
Your phone will have settings regarding file transfers when it is connected to a computer. Make sure that media viewing and transferring is selected, which will allow Windows 10 File Explorer on the computer to recognize your device.
Step 3: Import Photos and Videos
Now that your phone is recognized, you should see the camera or phone pop up along with your hard drives and other external drives. You can right click on its icon, select “Import Photos and Videos” and proceed from there.
 vMix 4K - Software based live production. vMix 4K includes everything in vMix HD plus 4K support, PTZ control, External/Fullscreen output, 4 Virtual Outputs, 1 Replay, 4 vMix Call, and 2 Recorders.
Step 4: Import
Your computer will tell you how many pictures and photos were found. You can either review, organize and group these items, or you can choose to import all the new items in one go.
The great thing about reviewing the photos and videos before importing them onto your computer is that you can choose folders for different files, name those folders and ensure that you are only importing files that are not on your system already.
Part 2: Start Importing in Photos App
Another option for you is the Photos app that is pre-installed in computers with Windows 10.
Go to Start -> All Apps -> Photos and open it up. Your phone or camera should be connected to the computer when you are attempting this process.
Click the Import button on the Photos app and choose the items that you want to import. When you have selected all the items you want, click on continue and then import. All your files will be added onto your computer and they will be visible within the Photos app.
Within the app, it is easy to see your photos and videos as they are organized based on the date they are imported. So you will be able to see exactly what you have added in the most recent imports and with future imports as well.
You may also like: How to Add Titles/Text to Video on Photos App in Windows 10 >>
Part 3: Troubleshooting the Phone to PC Connection
There are instances where you may have some problems connecting your phone to the computer, even if you have the USB cable connected on both ends.
The first thing to check is whether your USB port works. Try connecting some other device, such as a mouse or keyboard, into that port. If the device works, it means your port is not the cause of the problem. Now check the cable with a smartphone charger. If your phone charges with the cable, it means your cable is not a problem.
As mentioned above, you must ensure that you have enabled media and file transfers in the USB settings when you connect your phone to the computer. It is the only way that your computer has permission to access the files on your smartphone.
If you have an iPhone, ensure that your device is unlocked. You will get a “Trust this device” prompt and you must accept it. And if your photos are saved directly to iCloud and not your iPhone, you will need to complete a transfer from iCloud, which you can do by visiting the website or using the relevant desktop app.
Part 4: Import Photos and Video from a Camera
Those who are importing photos and videos from a camera rather than a smartphone can use the above options as well. Both Windows 10 File Explorer and the Photos app will be compatible with your camera, provided it can connect through a USB cable and a USB port on the computer.
Connect the camera to your phone and then follow the above steps to import your media content.
 Screensaver Factory, Create stunning professional screensavers within minutes. Create screensavers for yourself, for marketing or unlimited royalty-free commercial distribution. Make screensavers from images, video and swf flash, add background music and smooth sprite and transition effects. Screensaver Factory is very easy to use, and it enables you to make self-installing screensaver files and CDs for easy setup and distribution. Screensaver Factory is the most advanced software of its kind.
Conclusion
If you own a Windows 10 desktop or laptop, it is very easy to connect a smartphone or digital camera to your computer. Then you will be able to use File Explorer or the built in Photos app to access and download your photos and videos. Adding your content to the computer lets you save the files, share them with friends, edit them using programs like Photoshop, or save space on your smartphone/camera.
Shanoon Cox
Shanoon Cox is a writer and a lover of all things video.
Follow @Shanoon Cox
- Title: In 2024, Unlocking Windows 10 Seamless Media Importation Techniques
- Author: Christopher
- Created at : 2024-08-22 05:18:40
- Updated at : 2024-08-23 05:18:40
- Link: https://some-approaches.techidaily.com/in-2024-unlocking-windows-10-seamless-media-importation-techniques/
- License: This work is licensed under CC BY-NC-SA 4.0.