
"In 2024, Swift Solutions Shifting iOS Media Files"
Swift Solutions: Shifting iOS Media Files
Easy and Free Ways to Transfer Photos and Videos from an iPhone to a PC


Ollie Mattison
Mar 27, 2024• Proven solutions
No matter how much storage space you have on your iPhone every once in a while you have to free up space in order to be able to take new photos and capture more videos. 4K and HD footage takes up a lot of space which is why it is important to clear up your iPhone frequently. Photo and video editing apps for iPhones are unquestionably very powerful, but PC photo and video editing software simply provide more options, which is why knowing how to transfer your photos to a PC is important to all iPhone owners who take video and photo editing seriously.
3 Easy and Free Ways to Transfer Photos and Videos from iPhone to PC
- Method 1: Transfer photos directly by connecting the iPhone to a PC
- Method 2: Using iTunes to transfer pictures and videos to a PC
- Method 3: Transferring iPhone photos via iCloud to a PC
Method 1: Transfer photos directly by connecting the iPhone to a PC
In order to transfer still or moving images from your iPhone to a PC, you’ll need a USB cable to connect these two devices. Once you’ve successfully connected your device to the computer, unlock your iPhone and proceed to allow your computer to access the pictures stored on your phone.

![]()
Click on the My Computer icon on your desktop and locate your iPhone in the Portable Devices section. Double click on the icon to access the contents of your phone, and locate the DCIM folder in the Internal Storage folder where all photos are stored.
![]()
In the next step, you should select all the images you want to transfer to your PC and then use the right-click to copy them to a location on your PC where you want to store them.
If you want to copy all the pictures and videos from your iPhone to a PC, right-click on the Apple iPhone icon in the My Computer folder and then select the Import Pictures and Videos option from the menu.
![]()
Once the Import Pictures and Videos window appears on your screen, click on the Import Settings option to select the folder on your computer where you want to store the photos and videos.
![]()
You can also click on the Always Erase From Device After Importing to automatically delete photos and videos from your iPhone.
![]()
After selecting the destination folder and adjusting the settings, click on the OK button and wait for the pictures to be transferred to your PC.
Method 2: Using iTunes to transfer pictures and videos to a PC
Transferring photos from an iPhone to a PC with iTunes requires you to have this software installed on both devices. If this is the case, you should connect your iPhone to a PC with a USB cable, but before you do make sure that all files you want to transfer are located in the same folder on your iPhone.
![]()
Open the software on your PC and click on the iPhone icon in the menu located in the upper left corner of the iTunes. The Settings menu will appear on the left side of your screen and you should click on the Photo tab. At the top of the screen, you’ll be able to see the Sync Photo checkbox, click on it and then select the folder from the drop-down menu.
Locate the folder on your iPhone in which images you want to sync are located and select them. Once you’ve selected all pictures you want to transfer click on the Apply button located at the lower right corner of your screen. The duration of the transfer depends on the version of the Windows you have, and the transfer may be slow on some older versions of the OS.
 LYRX is an easy-to-use karaoke software with the professional features karaoke hosts need to perform with precision. LYRX is karaoke show hosting software that supports all standard karaoke file types as well as HD video formats, and it’s truly fun to use.
Method 3: Transferring iPhone photos via iCloud to a PC
Besides being remarkably simple this method of transferring photos from iPhone to PC will also save you a lot of time. If your PC and iPhone are connected through the iCloud service, each time you take a photo with your phone a copy of it will be saved on your computer, if you are connected to Wi-Fi. If you are not connected to the Internet at the moment when you are taking the picture, all photos will be automatically transferred the next time you connect your iPhone to Wi-Fi.

WPS Office Premium ( File Recovery, Photo Scanning, Convert PDF)–Yearly
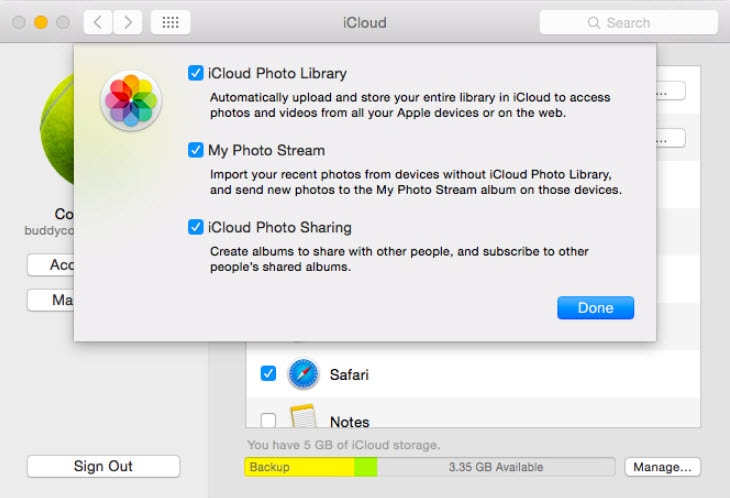
You need to enable iCloud service on your iPhone in your phone’s Settings menu and enable the Photo Stream option in order to start backing up your photos on a PC. Afterwards, you should install the iCloud Control Panel on your computer and two devices should be synced-in. However, transferring your videos with iCloud is not an option, and photos taken before this service was activated will not be automatically transferred. Despite this iCloud is an extremely simple and efficient way to back up all of your photos, and make sure that you can always have enough free space on your iPhone to take amazing photos.
Ollie Mattison
Ollie Mattison is a writer and a lover of all things video.
Follow @Ollie Mattison
Ollie Mattison
Mar 27, 2024• Proven solutions
No matter how much storage space you have on your iPhone every once in a while you have to free up space in order to be able to take new photos and capture more videos. 4K and HD footage takes up a lot of space which is why it is important to clear up your iPhone frequently. Photo and video editing apps for iPhones are unquestionably very powerful, but PC photo and video editing software simply provide more options, which is why knowing how to transfer your photos to a PC is important to all iPhone owners who take video and photo editing seriously.
3 Easy and Free Ways to Transfer Photos and Videos from iPhone to PC
- Method 1: Transfer photos directly by connecting the iPhone to a PC
- Method 2: Using iTunes to transfer pictures and videos to a PC
- Method 3: Transferring iPhone photos via iCloud to a PC
Method 1: Transfer photos directly by connecting the iPhone to a PC
In order to transfer still or moving images from your iPhone to a PC, you’ll need a USB cable to connect these two devices. Once you’ve successfully connected your device to the computer, unlock your iPhone and proceed to allow your computer to access the pictures stored on your phone.
![]()
Click on the My Computer icon on your desktop and locate your iPhone in the Portable Devices section. Double click on the icon to access the contents of your phone, and locate the DCIM folder in the Internal Storage folder where all photos are stored.
![]()
In the next step, you should select all the images you want to transfer to your PC and then use the right-click to copy them to a location on your PC where you want to store them.
If you want to copy all the pictures and videos from your iPhone to a PC, right-click on the Apple iPhone icon in the My Computer folder and then select the Import Pictures and Videos option from the menu.
![]()
Once the Import Pictures and Videos window appears on your screen, click on the Import Settings option to select the folder on your computer where you want to store the photos and videos.
![]()
You can also click on the Always Erase From Device After Importing to automatically delete photos and videos from your iPhone.
![]()
After selecting the destination folder and adjusting the settings, click on the OK button and wait for the pictures to be transferred to your PC.
Method 2: Using iTunes to transfer pictures and videos to a PC
Transferring photos from an iPhone to a PC with iTunes requires you to have this software installed on both devices. If this is the case, you should connect your iPhone to a PC with a USB cable, but before you do make sure that all files you want to transfer are located in the same folder on your iPhone.
 Easy GIF Animator is a powerful animated GIF editor and the top tool for creating animated pictures, banners, buttons and GIF videos. You get extensive animation editing features, animation effects, unmatched image quality and optimization for the web. No other GIF animation software matches our features and ease of use, that’s why Easy GIF Animator is so popular.
![]()
Open the software on your PC and click on the iPhone icon in the menu located in the upper left corner of the iTunes. The Settings menu will appear on the left side of your screen and you should click on the Photo tab. At the top of the screen, you’ll be able to see the Sync Photo checkbox, click on it and then select the folder from the drop-down menu.
Locate the folder on your iPhone in which images you want to sync are located and select them. Once you’ve selected all pictures you want to transfer click on the Apply button located at the lower right corner of your screen. The duration of the transfer depends on the version of the Windows you have, and the transfer may be slow on some older versions of the OS.
Method 3: Transferring iPhone photos via iCloud to a PC
Besides being remarkably simple this method of transferring photos from iPhone to PC will also save you a lot of time. If your PC and iPhone are connected through the iCloud service, each time you take a photo with your phone a copy of it will be saved on your computer, if you are connected to Wi-Fi. If you are not connected to the Internet at the moment when you are taking the picture, all photos will be automatically transferred the next time you connect your iPhone to Wi-Fi.
You need to enable iCloud service on your iPhone in your phone’s Settings menu and enable the Photo Stream option in order to start backing up your photos on a PC. Afterwards, you should install the iCloud Control Panel on your computer and two devices should be synced-in. However, transferring your videos with iCloud is not an option, and photos taken before this service was activated will not be automatically transferred. Despite this iCloud is an extremely simple and efficient way to back up all of your photos, and make sure that you can always have enough free space on your iPhone to take amazing photos.
 TubeDigger - online video downloader from mostly any site
Ollie Mattison
Ollie Mattison is a writer and a lover of all things video.
Follow @Ollie Mattison
- Title: In 2024, Swift Solutions Shifting iOS Media Files
- Author: Christopher
- Created at : 2024-08-22 03:59:10
- Updated at : 2024-08-23 03:59:10
- Link: https://some-approaches.techidaily.com/in-2024-swift-solutions-shifting-ios-media-files/
- License: This work is licensed under CC BY-NC-SA 4.0.