Eliminating Yellow Discoloration on Your Computer Display

Eliminating Yellow Discoloration on Your Computer Display
Quick Links
- Disable the Night Light
- Ensure the Cable Connection Isn’t Loose
- Reset the Monitor Settings
- Make Sure the GPU Is Properly Plugged In
- Check for App-Specific Issues
- Change the Default Color Profile
- Calibrate the Display Color
- Reinstall the Graphics Card Driver
Key Takeaways
- Turn off the Night Light feature. To do that, navigate to Settings > System > Display and switch off the toggle next to “Night Light.”
- Ensure that the display cable is securely connected to both the monitor and the motherboard, the GPU is properly seated in the PCIe slot, and manually reset monitor settings if necessary.
- Reinstall the graphics card driver and adjust the default color profile. If the problem persists, consider calibrating the display color as a final option.
If your laptop screen has taken on a yellowish tint, the Night Light feature could be enabled. The issue could also stem from a loosely connected display cable, corrupted graphics drivers, or misconfigured monitor settings. Here are some troubleshooting steps you can try to resolve the issue.
Disable the Night Light
The Night Light feature is designed to reduce the blue tone of your monitor, giving the screen a warmer appearance, but it makes the screen appear yellowish. If you’ve adjusted your display settings and noticed a yellow tint afterward, this feature has likely been enabled. To check if this is the case, right-click on the Start button and select “Settings.”
Then, click on the “System” tab on the left-hand side and navigate to “Display” settings on the right. If the Night Light toggle is currently enabled, switch it off.

Ensure the Cable Connection Isn’t Loose
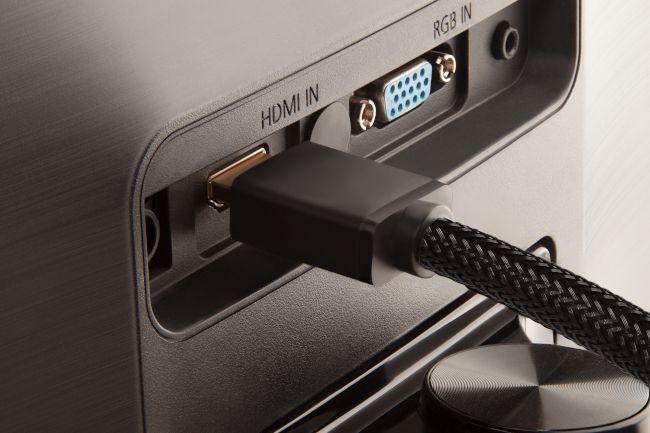
The display cable transmits video signals from the video card to the monitor. These signals can be analog or digital, depending on the type of cable and the devices involved. If the cable is not securely plugged in at either end, it can lead to poor connection quality, which might present problems like a yellow tint on the screen.
To rule out this possibility, disconnect the video cable from both the monitor and computer. Clean any dust from its connectors, and then securely plug it into place. If the cable is already securely connected, ensure it isn’t damaged. Carefully inspect the display cable for any signs of damage or wear, like bent pins or plugs, torn or cut sheathing, or signs that the wire has been aggressively bent. If the cable is damaged, you’ll need to replace it. To confirm that was the problem, try using a spare cable to connect the computer to the monitor if you have one available.
Alexander_Evgenyevich/Shutterstock.com
Reset the Monitor Settings
If you’ve manually tweaked the monitor settings by pressing the monitor buttons, ensure that you haven’t misconfigured its display settings. To rule out this possibility, you should reset the monitor settings to their default values. The process for doing this can vary depending on the manufacturer of your monitor.
Generally, you’ll need to press one of the navigation buttons to open the Settings menu. From there, using the navigation arrows, locate the option to factory reset the monitor. For example, on a Dell monitor, you may find this option under the Others settings menu.
If you can’t find it, refer to the manufacturer’s website for instructions on resetting your specific monitor model.
Make Sure the GPU Is Properly Plugged In
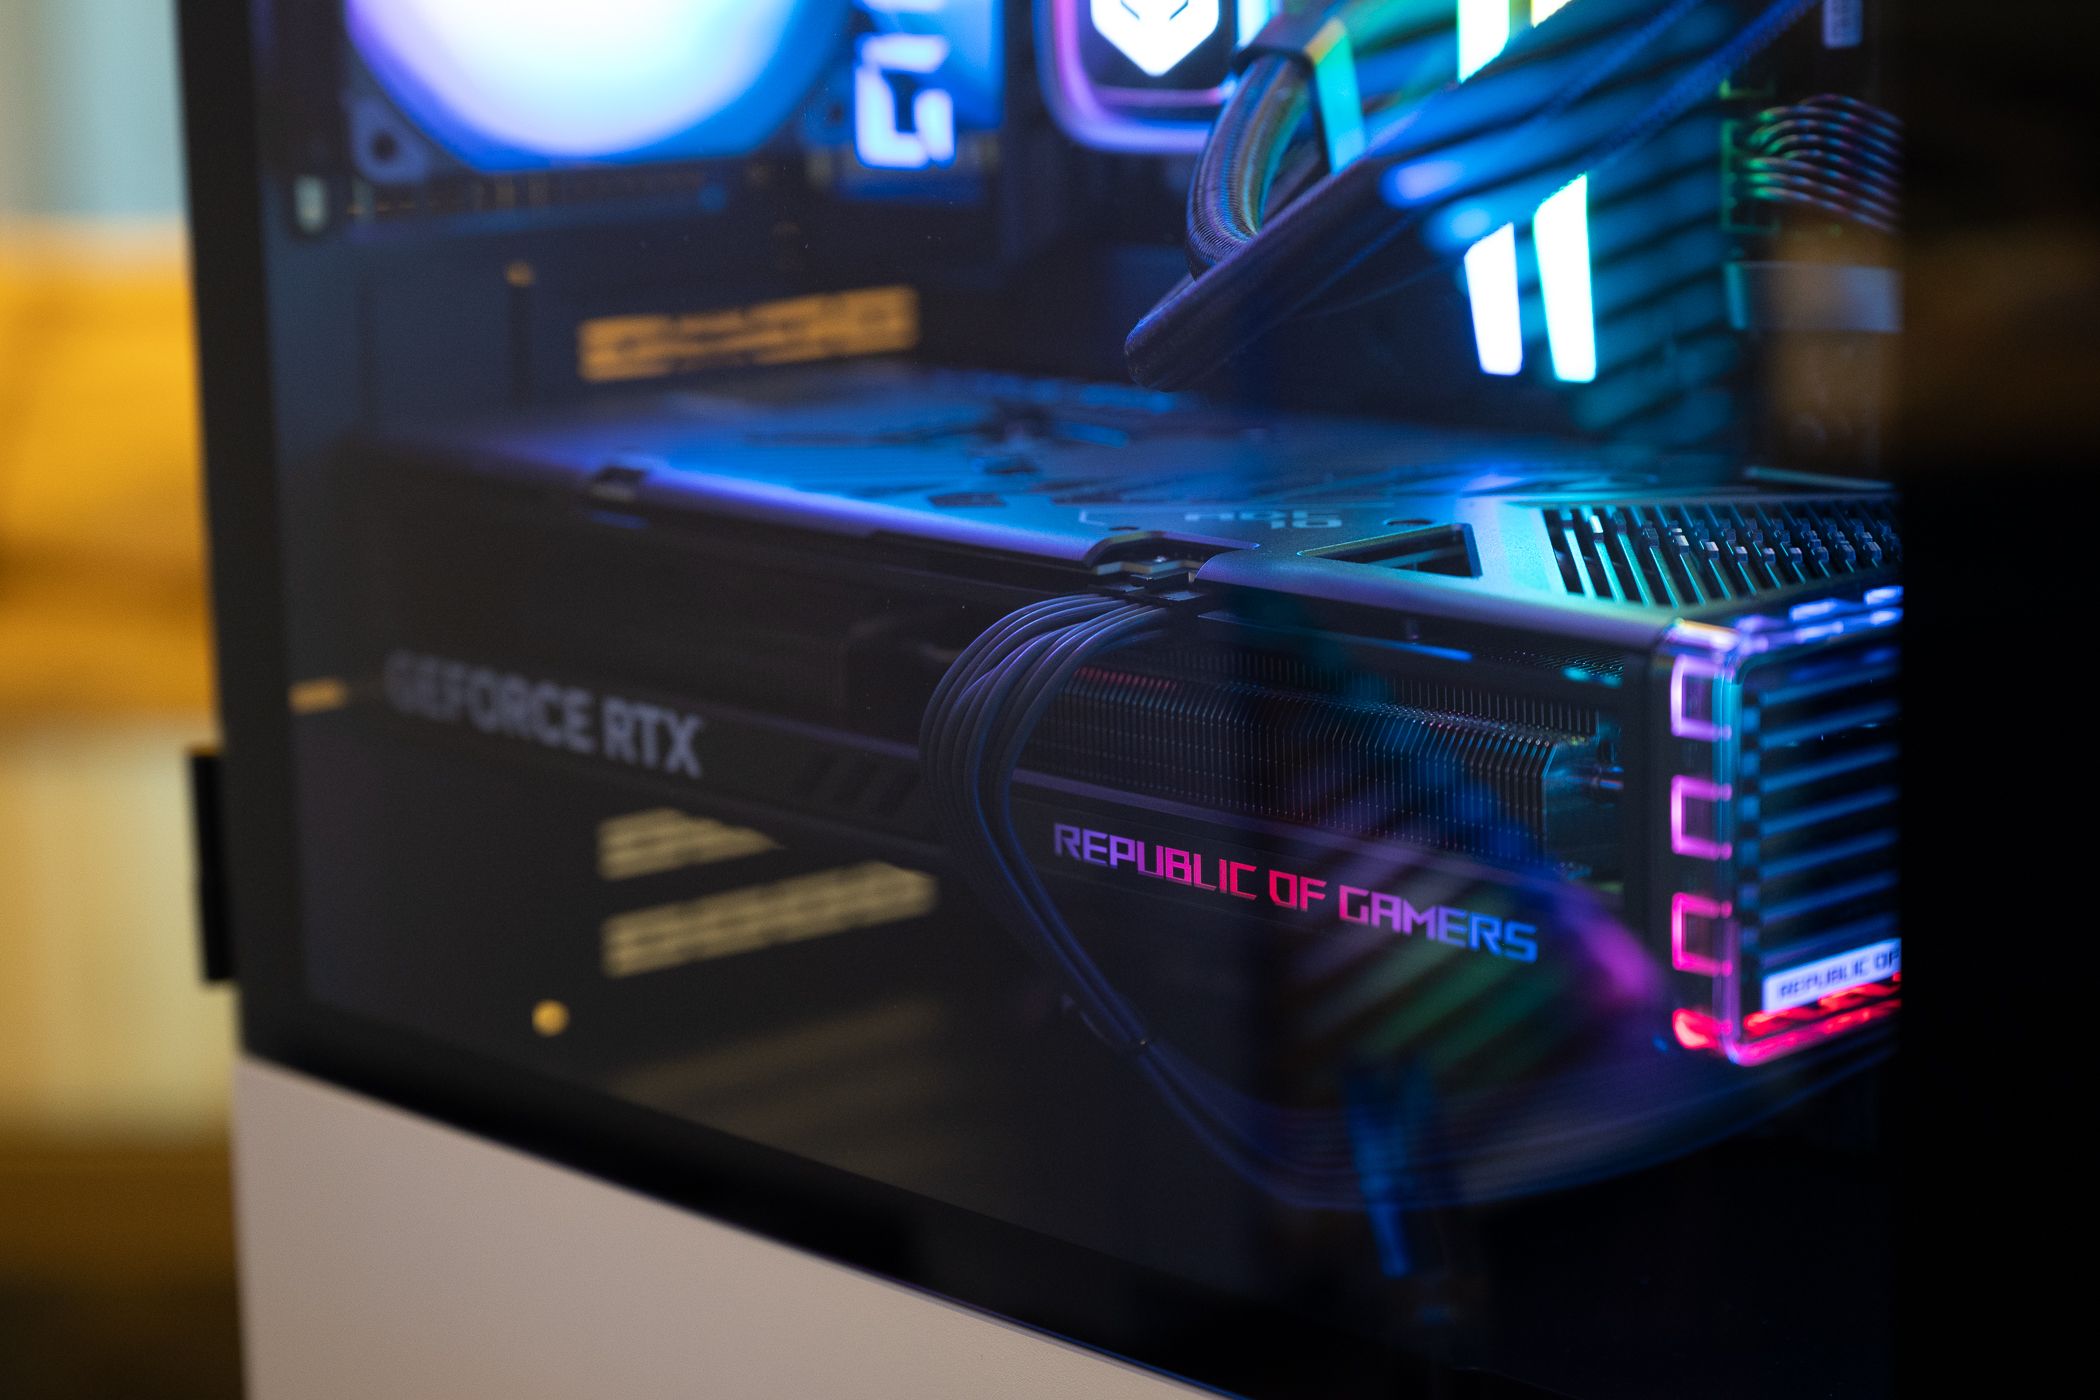
Similar to the display cable, a loosely connected GPU in the PCIe slot can also affect color accuracy and may cause a yellow tint on the screen. To ensure this isn’t the issue, open your computer casing and carefully remove the GPU from the PCIe slot. Then, firmly reinsert it into the slot. If you hear a clicking sound, it indicates that the GPU has been properly seated.
Justin Duino / How-To Geek
Also, if the power connector supplying power to the GPU is loosely connected, it can lead to inconsistent power output and cause display problems. To rule out this possibility, disconnect the connector from both the GPU and PSU, clean the socket where the power connector goes in, and then reconnect the connector securely.
Check for App-Specific Issues
If the yellowish tint only occurs when using a specific app, the problem is likely to be unique to that application. There are several potential causes to consider: the app’s settings may have the night light or a similar feature enabled, the app’s graphics requirements may exceed what your CPU or GPU can handle, or you might have misconfigured the app’s graphics settings.
If you use dedicated software to manage your GPU, such as NVIDIA’s Control Panel, reset its settings to make sure that a specific setting in that software isn’t the cause.
Change the Default Color Profile
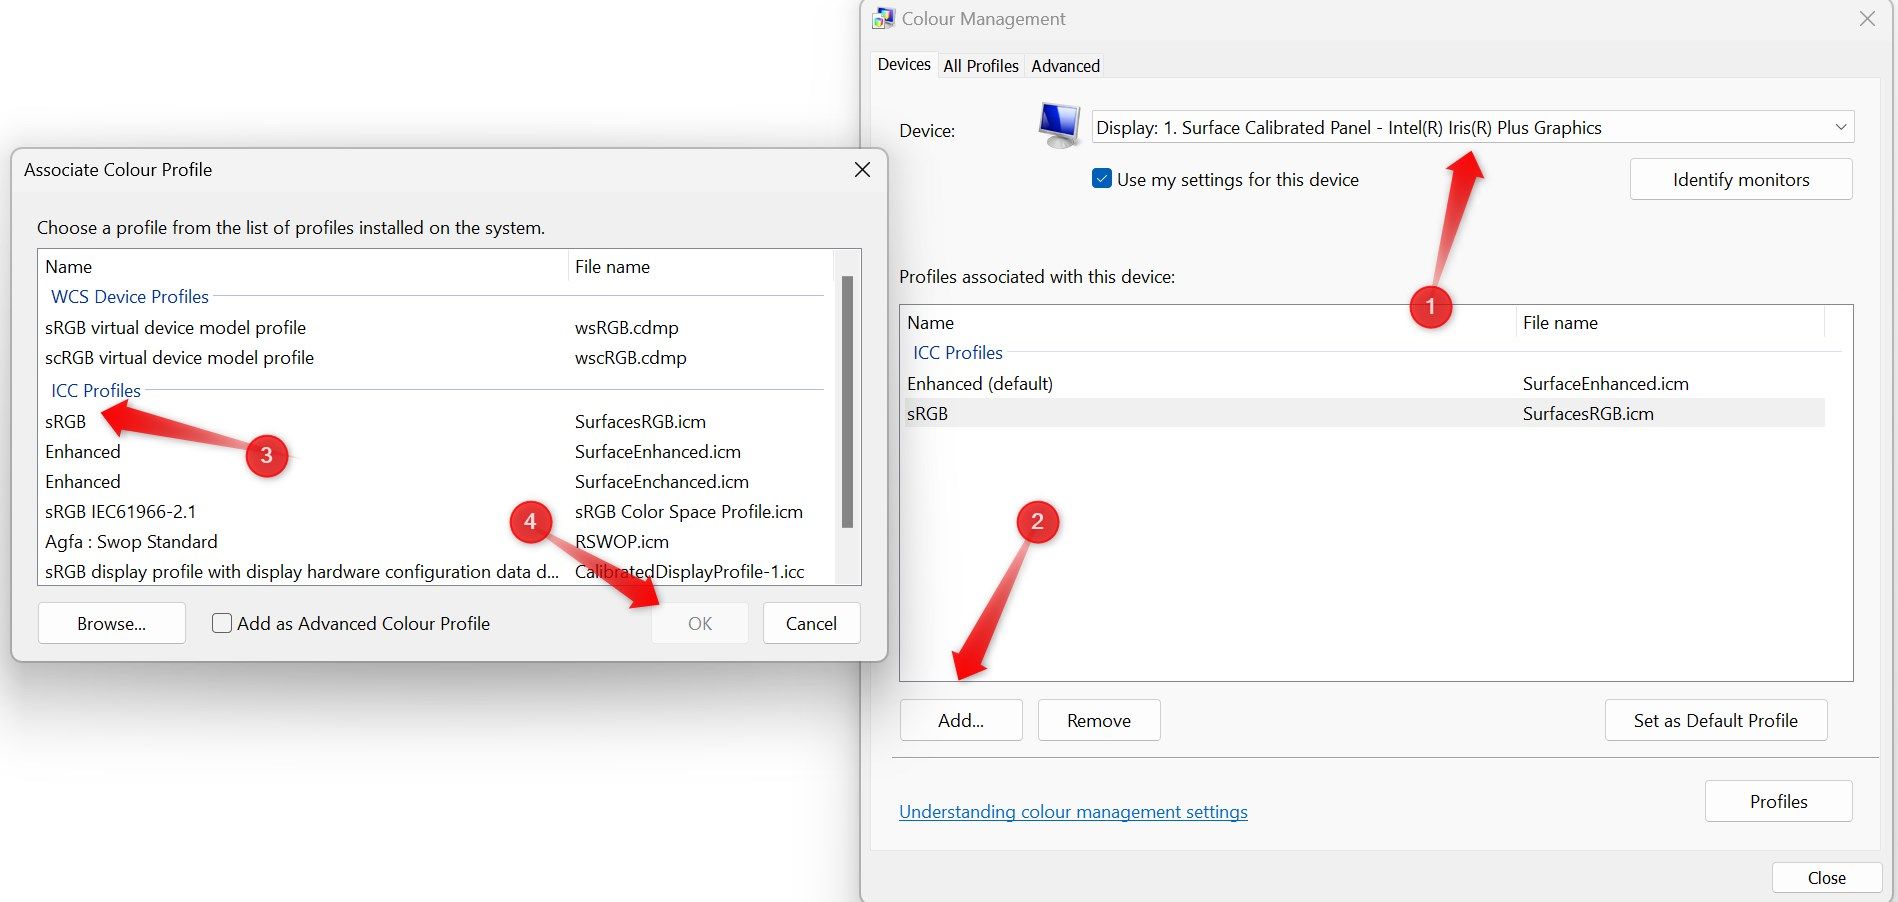
Changing the default ICC profile may also fix the issue with your monitor’s display. To do this, right-click on the Start button and select “Settings.” Then, navigate to System > Display. Click on “Advanced Display” under Related Settings. If you have multiple displays connected, make sure you choose the correct one from the drop-down menu in the top-right corner.

Next, click on “Display Adapter Properties for Display 1 (or 2),” go to the “Color Management” tab, and click on the “Color Management” button.

In the next window, select the correct display from the drop-down menu next to Device. Then, click on the “Add” button, choose the “sRGB” profile from the ICC profiles list, and click “OK.”
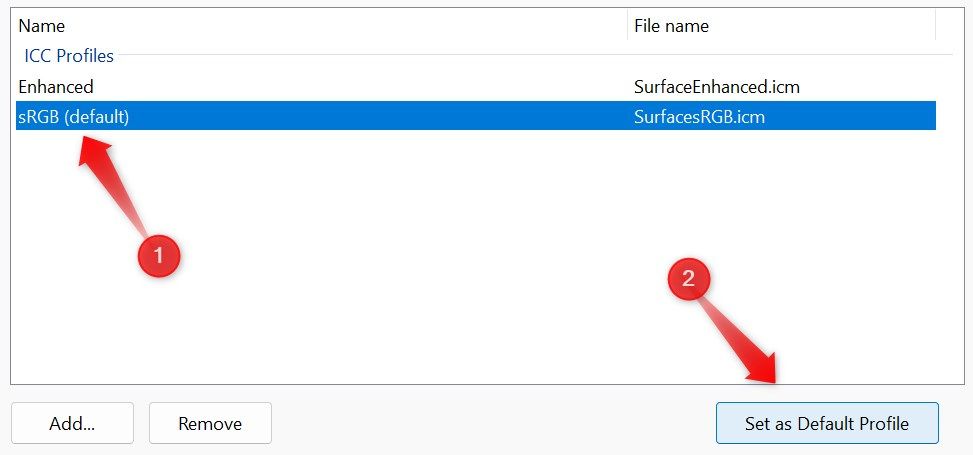
After that, select the newly added profile and click on the “Set as Default Profile” button. Close all windows, restart your device, and check if the yellow tint issue has been resolved.
Calibrate the Display Color
If none of the above-mentioned solutions fix the issue, you may need to calibrate the display color. Calibration fine-tunes your display to known color reference standards, which can help eliminate color irregularities such as the yellow tint. To calibrate the display, type “Color Management” into Windows Search and open the “Color Management” window.
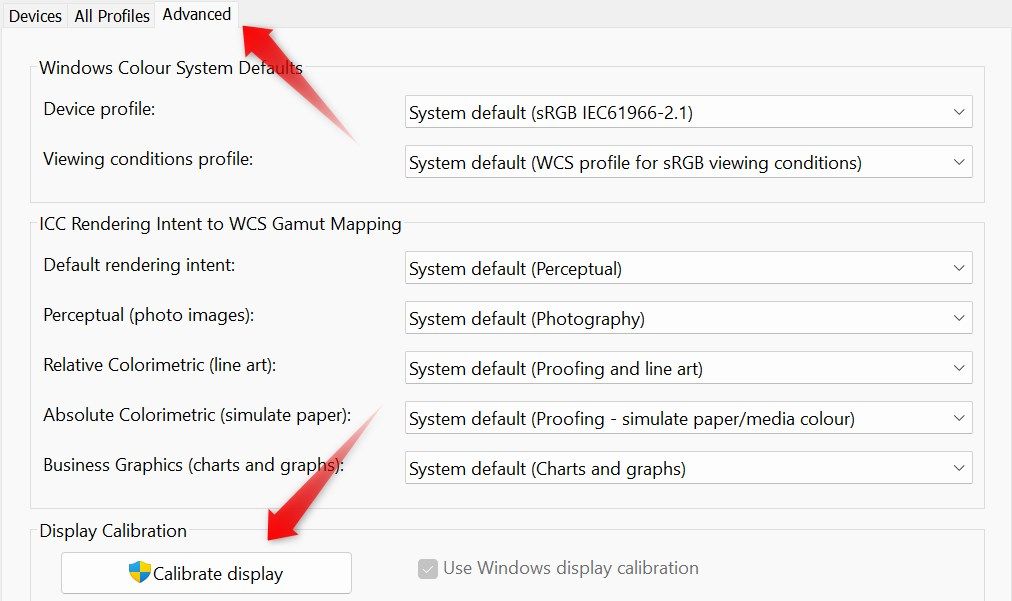
Then, navigate to the “Advanced” tab and click on the “Calibrate Display” button. Follow the on-screen instructions in the Display Color Calibration window to calibrate the display.
Reinstall the Graphics Card Driver
Outdated or corrupted graphics card drivers can also cause unexpected graphics issues. To rule out this possibility, update or reinstall them. Download the latest drivers from your GPU manufacturer’s website. If the file is in executable format, run it and follow the on-screen instructions to install it.
If you have to install the driver manually, right-click on the Start button and select “Device Manager.” Expand the “Display Adaptors” category, then right-click on the relevant driver and choose “Update Driver.” Select “Browse My Computer for Drivers,” locate the downloaded driver file, and follow the on-screen instructions to complete the update.
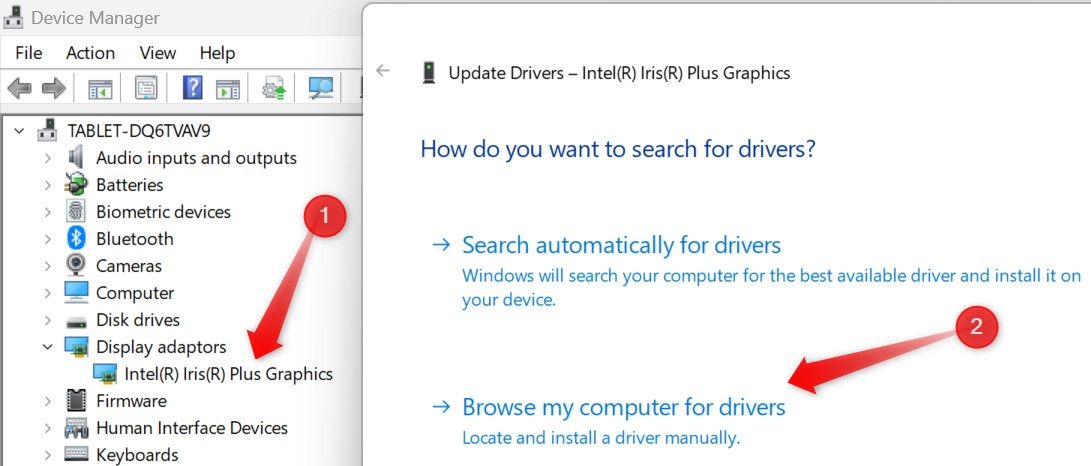
Likewise, follow the steps outlined above to update the monitor drivers.
If updating doesn’t resolve the issue, reinstall the driver. Right-click on the driver in Device Manager and select “Uninstall Device.” Then, follow the same steps to reinstall it from scratch.
If you use a dedicated graphics card, make sure to clean install the graphics drivers from the GPU manufacturer .
Seeing a yellowish tint on your laptop screen can be frustrating. By implementing the solutions outlined above, you will be able to pinpoint the root cause of the issue and resolve it. If the problem persists, your final option should be to have your laptop examined by a technician and rule out any potential hardware issues.
Also read:
- [New] Guided Pathway for Large File Exchange in Apple Ecosystem for 2024
- [New] Time-Efficient Ways to Wipe Out Ssgnature Backdrops
- [New] Understanding Slug Lines Essentials & Application Guide
- [New] Unlocking Full Potential of Mixer Streaming on macOS
- [New] Why Is There No Sound on Twitter Videos? | Fixes for 2024
- [Updated] Tailored Ending Scenes - Get 'Em for Free
- 2024 Approved 100 Instagram Captions to Show Yourself to the World - Filmora
- 2024 Approved The Ultimate List of Firefox Plugins for Easy Facebook Video Retrieval, 2023 Edition
- 2024 Approved Unveiling the Art of HDR Photography on iPhone
- Boosting Efficiency in Telecommuting: A Guide to the 6 Best Uses of ChatGPT for Independent Contractors
- In 2024, Summit Elite 25 Testing Analysis
- In 2024, Ultimate 360-Degree Shoot Selecting Your Perfect Model
- In 2024, Unlocking the Full Screen Potential of Premiere Pro
- Next Level Gameplay: Best Portable Accessories for Nintendo Switch
- Solving Windows 10 Setup Issues: Overcoming Initialization Problems with Ease
- Title: Eliminating Yellow Discoloration on Your Computer Display
- Author: Christopher
- Created at : 2025-01-03 17:20:38
- Updated at : 2025-01-09 19:48:45
- Link: https://some-approaches.techidaily.com/eliminating-yellow-discoloration-on-your-computer-display/
- License: This work is licensed under CC BY-NC-SA 4.0.